Ok, so I have been tinkering with Blender of late, even going so far as to enroll in an online course (The Nature Academy).
Over the course of various tutorials, lessons, etc, it became necessary to update Blender from the 2.49 release currently found in Natty (Ubuntu 11.04) to something more recent. Initially, I used the most excellent PPA Blender SVN maintained by Ralf Hölzemer.
This was great, up to the point where it seemed each commit broke one of the lessons or tutorials I was working on. Of course, this was to be expected, as the PPA provided a daily build for the in development 2.59 series.
Now that Blender 2.59 is released, I felt it was time to make a stable build. That was pretty easy, take the 2.59 package snapshot from Oneiric (Ubuntu 11.10) as a starting point and backport to Natty. Update it to use the official 2.59 source tar.gz from Blender.org. Add in a little flavor from the Blender SVN package, and voila, you have a nice 2.59 build.
While this was going on, I was also still working on the lessons from my online course, and the most recent lesson came out on Oceans. Unfortunately, this lesson required downloading a special build from Save the Ocean Sim. This was sub-optimal, I had just built 2.59 and now needed to use an earlier build and for one not built for Natty.
After going to the Save the Ocean Sim site, I downloaded the most recent patch and applied it to my build for 2.59. With much happiness (and minimal fiddling), it all compiled and tested fine with the ocean test blend from their site.
So,
open up a terminal, and do the following to get this new Blender build:
sudo add-apt-repository ppa:roderick-greening/blender
Cheers and happy blendering,
Rod.
Showing posts with label kubuntu. Show all posts
Showing posts with label kubuntu. Show all posts
Tuesday, August 23, 2011
Monday, March 14, 2011
In response to "the libappindicator story"
I generally never weigh in on these things, but I think in this case I understand what some may be missing here.
This is in reference to the following blog post: the libappindicator story
Each side refers to process and how the other side failed to follow it. My question is "can anyone point me to the relevant documentation which shows the process being referred to" and "can both parties review this process to see where they fell down" and "can the process be reviewed to ensure that it is clear and works so as to prevent similar future issues".
I suspect that there is no documented process, nor is it generally understood as to how all this was supposed to work by both parties. It's easy to reject an idea citing some failure to comply with a non-documented process. I'd like to be proven wrong and see that a process actually exists and work from there, but I suspect it's currently vapourware.
It's fine for you to state Canonical did not follow the process, but to not link to a doc or provide a post showing the process as approved by either GNOME or the team within GNOME responsible for this particular area, it's quite frankly irresponsible.
In order to make any such claim, you need tangible documentation. GNOME is big enough and the teams are diverse enough, that you need to document process. How else do you get efficient and allow new development to occur? You cannot exist forever in a vacuum.
So, if there is indeed a well documented process, show us the link. Show Mark that his team failed to follow the documented process. Then, once that's done we can move on. Mark will admit defeat and apologize and we can call it a day.
However, if this is not well documented nor consistent across GNOME projects, then GNOME needs to recognize that the lack of a documented process may have contributed here and let's correct that and move on.
PS: I work in a very process driven area (customer service and delivery) and it requires well documented processes to function. I understand all to well when some process exists virtually and is not well documented what can happen. Orders get missed, revenue drops, productivity suffers. As well, people point fingers. The only way to rectify is document the process and get everyone to acknowledge it. The process doesn't have to be perfect, it just has to be documented so you can at least have a reference point to move forward from.
Peace.
Monday, December 13, 2010

Monday, October 4, 2010
Android Programming in Ubuntu - The Journey Begins
So, having had some free time and a little kick in the creativity pants (thanks to Rick Spencer), I've embarked on a journey to try my hand at some 'Droid programming.
To get started, I purchased "Sams Teach Yourself Android Application Development in 24 Hours", by Lauren Darcey and Shane Conder (ISBN: 978-0-321-67335-0). This should be readily available a Chapters, Amazon, etc., and cost's $47.99 CAD.
The book is fairly straight forward, and easy to follow. So far, I completed the first 4 hours, and have had a great time in trying out the examples and all the extra exercises at the end of each chapter.
As I go through the lessons, I'll post my progress, and provide some useful tips, tricks, etc that I have found along the way.
In my next post I'll cover how to set up your environment under Ubuntu, and some things the book either missed or have changed since printing.
Stay tuned!
Tuesday, November 24, 2009
Copy playlist files to your Media player in Amarok
Ok, so last night I was trying to help my wife with something in Amarok. She has made a few playlists that she uses for her dance classes, and was looking for a simple way to transfer the songs in the playlist to her media player. I was shocked to discover that this feature had not yet made its way into Amarok 2.
After some digging around, I found that there was a way to do this via Amarok scripting, and in fact someone had written and posted one online. It is available using the GHNS feature in Amarok under the Script Manager, and is called "Copy Selected Files" (search under most downloaded).
For those not familiar with how to add and/or enable these scripts, please have a look at the quick video below. I didn't add any audio, but the visual should be enough.
Tuesday, November 3, 2009
Have a Dell Laptop and want Kubuntu with Recovery Partition...
Well, I recently purchased a Dell Mini 10v, and wanted to have Kubuntu 9.10 on it. I purchased it with Ubuntu, but it came with Ubuntu 8.04, and it was the lpia version. Neither of these appealed to me, however, the Dell recovery partition did. So, I set out trying to find a way to get Kubuntu on there with a recovery partition.
Thanks to Mario Limonciello (superm1), who works for Dell, I was able to get a process that more or less works, and gives me a recovery option for Kubuntu 9.10.
Here's basically what you need to do.
1) Download the DVD iso for Kubuntu Karmic 9.10 to your system.
2) Visit https://launchpad.net/dell-recovery/+download and grab the latest dell-recovery deb (at least version 0.27) for Karmic and install it from any Karmic system (gdebi can be used here). This will not work from a live CD/DVD as the process requires a lot of temportary space to work with, so you must be in a working Karmic install (Ubuntu, Kubuntu, etc).
3) Now, run the dell-recovery-media program as follows:
dell-recovery-media --builder
The --builder option is a recent addition by Mario, which allows building Dell recovery media from any Ubuntu ISO, so it will work with Kubuntu, with a few tweaks.
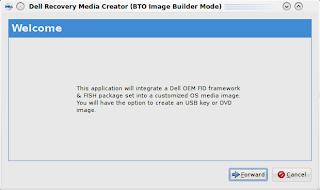
4) Click the Forward button and you are given an opportunity to choose the ISO to build the Dell image from.
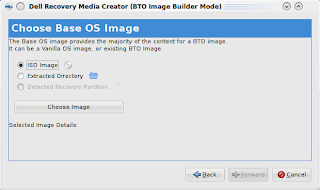
Click on Choose Image and select the Kubuntu DVD iso you downloaded earlier.
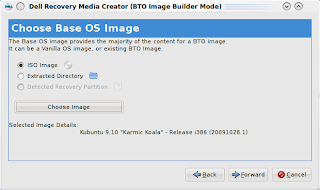
The screen will update and show some details about the image (which should show Kubuntu Karmic 9.10).
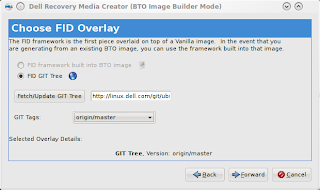
5) Click the Forward button, and hit Fetch/Update GIT Tree.

This may take a few minutes to complete.
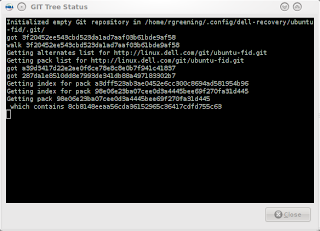
Once the fetch is completed, hit the Close button in the GIT Tree Status window. From the GIT Tags drop down, select Origin/Master.
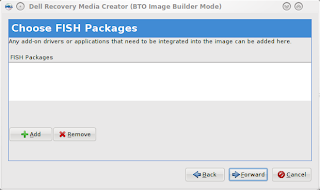
6) Click the Forward button to go to the FISH screen. This allows you to add additional packages to the install process. We are going to skip this for now (I may expand on this in a future post).
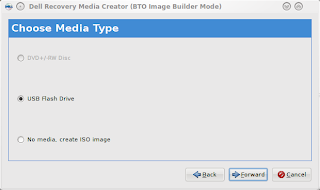
7) Click the Forward button and choose to create a USB Flash Drive
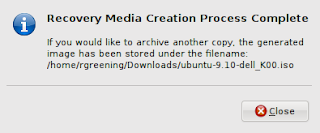
8) Click the Forward button and enter a version number (I chose K00 for Kubuntu ), then click Apply.
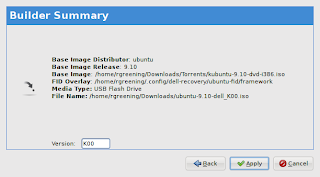
Enter your password when prompted to Authenticate. The program will now start building the new ISO to copy to the USB Stick.

9) This will then launch the usb-creator application. At this point, you should be able to simply click Make Startup Disk (See some of my previous blog entries about usb-creator-kde for more info about this).
10) After the startup disk completes installing, you can close it and the Dell Recovery window which pops up after.
11) The last step you need to perform is to remove the del-recovery deb from the newly created USB Startup Disk, as it is gtk based, and has some additional deps that are not found on the default install media and will thus fail during the install process. Assuming the mount point for the media stick is /media/disk, you would preform the following command to remove this file:
rm /media/disk/debs/main/dell-recovery_*_all.deb
12) It is now safe to unmount the USB Stick or reboot if you wish to install from it now.
13) After you install the new dell image, you should re-install the dell-revocery application. Unfortunately, one of the deps is currently missing from the package. To get around this, you will need to install policykit-1-gnome as follows:
sudo apt-get install policykit-1-gnome
Then use gdebi to install dell-recovery, which you downloaded (refer to step 2 for the link).
14) Now, you can use dell-recovery-media to rebuild the ISO from the recovery partition and make as many USB disks or ISO's as you want. As well, you can now access the restore option in grub (hold space bar during boot to expose the boot options).
I hope this is useful to you. I will be working with Mario to see how hard it would be to create a Qt/KDE front-end for the dell-recovery package, so that we can avoid having to remove anything.
Thanks to Mario Limonciello (superm1), who works for Dell, I was able to get a process that more or less works, and gives me a recovery option for Kubuntu 9.10.
Here's basically what you need to do.
1) Download the DVD iso for Kubuntu Karmic 9.10 to your system.
2) Visit https://launchpad.net/dell-recovery/+download and grab the latest dell-recovery deb (at least version 0.27) for Karmic and install it from any Karmic system (gdebi can be used here). This will not work from a live CD/DVD as the process requires a lot of temportary space to work with, so you must be in a working Karmic install (Ubuntu, Kubuntu, etc).
3) Now, run the dell-recovery-media program as follows:
dell-recovery-media --builder
The --builder option is a recent addition by Mario, which allows building Dell recovery media from any Ubuntu ISO, so it will work with Kubuntu, with a few tweaks.

4) Click the Forward button and you are given an opportunity to choose the ISO to build the Dell image from.

Click on Choose Image and select the Kubuntu DVD iso you downloaded earlier.

The screen will update and show some details about the image (which should show Kubuntu Karmic 9.10).
5) Click the Forward button, and hit Fetch/Update GIT Tree.

This may take a few minutes to complete.

Once the fetch is completed, hit the Close button in the GIT Tree Status window. From the GIT Tags drop down, select Origin/Master.

6) Click the Forward button to go to the FISH screen. This allows you to add additional packages to the install process. We are going to skip this for now (I may expand on this in a future post).

7) Click the Forward button and choose to create a USB Flash Drive

8) Click the Forward button and enter a version number (I chose K00 for Kubuntu ), then click Apply.

Enter your password when prompted to Authenticate. The program will now start building the new ISO to copy to the USB Stick.

9) This will then launch the usb-creator application. At this point, you should be able to simply click Make Startup Disk (See some of my previous blog entries about usb-creator-kde for more info about this).
10) After the startup disk completes installing, you can close it and the Dell Recovery window which pops up after.

11) The last step you need to perform is to remove the del-recovery deb from the newly created USB Startup Disk, as it is gtk based, and has some additional deps that are not found on the default install media and will thus fail during the install process. Assuming the mount point for the media stick is /media/disk, you would preform the following command to remove this file:
rm /media/disk/debs/main/dell-recovery_*_all.deb
12) It is now safe to unmount the USB Stick or reboot if you wish to install from it now.
13) After you install the new dell image, you should re-install the dell-revocery application. Unfortunately, one of the deps is currently missing from the package. To get around this, you will need to install policykit-1-gnome as follows:
sudo apt-get install policykit-1-gnome
Then use gdebi to install dell-recovery, which you downloaded (refer to step 2 for the link).
14) Now, you can use dell-recovery-media to rebuild the ISO from the recovery partition and make as many USB disks or ISO's as you want. As well, you can now access the restore option in grub (hold space bar during boot to expose the boot options).
I hope this is useful to you. I will be working with Mario to see how hard it would be to create a Qt/KDE front-end for the dell-recovery package, so that we can avoid having to remove anything.
Monday, October 5, 2009
Arora 0.10 in Kubuntu 9.10
For anyone looking to try out a lightweight browser under KDE (or even Gnome for that matter), they should definately give Arora a test run.
For the upcoming Karmic Koala release, we have worked very closely with the upstream Arora developers to ensure we have a nicely integrated browser, which can serve as an alternative to the default system browser.
For example, in this release, we see AdBlock support as well as wallet (password/form autofill) support. This was missing in the 0.9 and earlier series, and was definately a feature I missed when testing out this, otherwise, fantastic browser.
Now that it has the wallet and AdBlock features, I can heartily recommend that everyone give it a serious try. If you find the default system browser doesn't work on some of your favorite sites or you find Firefox to be a bit bloated, then you will surely love Arora.
Check out www.kubuntu.org for details on downloading the new Karmic Koala beta or if you already have the beta running, simply install Arora in Add/Remove software.
To find out more about Arora, please see www.arora-browser.org.
Monday, September 28, 2009
Switching from Acer to Dell...
I have been a long time supporter of Acer, and have 4 Acer systems. However, due to recent issues in dealing with their technical support (helpless desk) I have given up on Acer and instead switched to Dell.
Dell has embraced Linux, and especially with partners like Canonical pushing for more preinstalled Ubuntu systems from Dell, I can only imagine Dell doing bigger and grander things with Linux and Ubuntu.
Given that, I have decided to switch to Dell and throw my support behind them. I have also just today ordered two brand new netbooks from Dell, and will be selling my old Acers.
It's important I believe to start and support vendors who are truly cogniscent of Linux and are willing to work with developers to ensure their systems work well with Linux. Dell is going down the correct path, so here's my thumbs up Dell and Great Job.
And good-bye Acer, it was fun while it lasted.
Tuesday, September 15, 2009
Recover a Non-booting Linux System
Ok, inevitably, it will come to pass that if you are testing out Alpha Releases, you will experience at least one time in your life where the system will not boot.
Recently, while working on Karmic (Ubuntu 9.10), I did an update an rebooted into a non functional system. Apparently just before freeze for Alpha 6, there were some uploads which caused the build systems to not completely build all the necessary packages. Hence I had a partial update.
Anyway, things seem to be resolved now, so on to recovery. I am documenting this mostly so I remember how to do it again (copy/paste is your friend) and maybe it will be useful to others.
First, you need a live CD/DVD/USB running your favorite Linux. In my case, it's Kubuntu. I used my usb-creator-kde to make a live USB from a known working and recent release.
After booting into your live environment, you need to open a terminal and switch to mount your partitions under /mnt.
To determine the partitions, you can use fdisk as follows:
ubuntu@ubuntu:~$ sudo fdisk -l
Disk /dev/sda: 320.1 GB, 320072933376 bytes
255 heads, 63 sectors/track, 38913 cylinders
Units = cylinders of 16065 * 512 = 8225280 bytes
Disk identifier: 0xd88dfd16
Device Boot Start End Blocks Id System
/dev/sda1 * 1 61 489951 83 Linux
/dev/sda2 62 38913 312078690 5 Extended
/dev/sda5 62 1306 10000431 82 Linux swap / Solaris
/dev/sda6 1307 7385 48829536 83 Linux
/dev/sda7 7386 38913 253248628+ 83 Linux
Disk /dev/sdb: 2057 MB, 2057306112 bytes
64 heads, 62 sectors/track, 1012 cylinders
Units = cylinders of 3968 * 512 = 2031616 bytes
Disk identifier: 0x0000a283
Device Boot Start End Blocks Id System
/dev/sdb1 * 1 1012 2007777 b W95 FAT32
sdb is my USB drive and sda is my HDD. sda1 is /boot, sda6 is / and sda7 is home. Yours will likely be different.
After you figure out your partitions, you will mount them as follows:
ubuntu@ubuntu:~$ sudo mount /dev/sda6 /mnt
ubuntu@ubuntu:~$ sudo mount /dev/sda1 /mnt/boot
ubuntu@ubuntu:~$ sudo mount /dev/sda7 /mnt/home
Verify everything looks correct before proceeding (i.e. you got the partitions correct and mounted in the correct places).
Next, you need to take care of /proc and /dev as follows:
ubuntu@ubuntu:~$ sudo mount -t proc none /mnt/proc
ubuntu@ubuntu:~$ sudo mount -o bind /dev /mnt/dev
Ok, now you have setup your chroot environment, and may change into it:
ubuntu@ubuntu:~$ sudo chroot /mnt
At this point, you should be able to update your system, add/remove packages using apt-get, or edit any files you need to fix the system.
In my case, a simple apt-get update && apt-get upgrade will fix things.
After making your changes you need to exit the chroot and unmount the partitions in the reverse order.
Now you should be able to safely exit the live system and reboot.
Hope this helps.
Thursday, July 30, 2009
Fishing Trip...
So, taking a break from my Ubuntu development, I decided to go on a fishing trip with a friend of mine.
We went to a truely remote community in Newfoundland called Rencontre East. It's only accessible by Ferry, and it's a 3 hour car ride to get to the Ferry. It's an outport fishing town with a population of about 170 according to 2006 statistics, though I believe more recent numbers would put it closer to 120. Primary industry is the fishery - Cod, Caplin, Lobster, and Crab.

It is an absolutely beautiful place to visit. The mountains and valley were forged by a glacier, and there is a fiord (lake) nestled between the mountains, which is 600 feet deep. The lake is home to sea trout and salmon, and possibly other species. Our desitination was to a small cabin at the far end of the lake, and required us to take a boat from the coastal side of the lake to its head.

We fished along the way, using a locally made spinner called a spoon spinner. It seems to be the only thing that works in this lake, for the majority of the fishing done here. We managed to catch 13 trout that afternoon, before finally setting foot on the far shore and the beach in front of our cabin.

The next day, we had trout for breakfast, and they were quite a treat. There is nothing better than enjoying the fruits of your labor. After breakfast, we got geared up for a trek around the lake by foot. We have to cross two shallow rivers, as we trek to the left of the cabin, and around the lake. It's rough going, as the shoreline is peppered with fallen rocks and boulders from the sheer rock faces above. As well, there are many natual springs and spectacular waterfalls.

We fish along the coast for about 4 hours and it starts to rain. My friend is a short distance ahead of me, at what the locals call Duffy's point, while I have sought out the protection of a small overhang of rock, where I make a dry place to sit and have a snack while the rain falls effrortlessly on the lake. My friend makes his way back to my semi-dry shelter, and we enjoy a drink and some home made trail mix. We discuss my inability to land any trout today, and his many catch and releases and the 3 keepers he has so far. I am feeling a bit dismayed to say the least.

After the rain let's up, we decide to turn back for the day, and fish our way back to the cabin. Part way back, I stop at a spot where I know there should be some good fishing. Since I'm not having any luck with the spinner, and I' tried every lure I have, I decide to try a plain old bobber and worm. The locals warned me that this never works and you can't catch anything without a spoon spinner here. So far, that seemed to be the case, but I was real desperate to not be shown up.
So, I set up my line and cast. No sooner than the line hit the water and I had a strike and lose it. Followed by several others, that I cannot land. My friend sees that I am now sitting on a rock and not following him back. I motion him to wait or come back, which he does the latter. By the time he get's back to me, I have landed my first keeper for the day. It's not huge, but it will do. We stay a bit longer and eventually I catch another worth keeping. So, you can catch by bobber here.. wish I had tried this earlier today.
Eventually, we get moving again, and after a total of 6 hours walking and fishing, we are back at the cabin. We set a fire and prepare a meal of chicken and some bottled moose. We play some cribbage, anbd have a few drinks before finally retiring for the night.
The next day, we plan to fish for the morning and then we will boat back to the other end of the lake and back to town. We had an offer to go out on the ocean and jig for Cod fish, and we are quite looking forward to this. The mornings fishing was uneventful, and my friend managed to land one trout, while my line lay bare. At least we had Cod jigging to look forward to.
While we never caught many trout, the trip was amazing. Anyone looking to get a real outport experience, simply must travel to Rencontre East. The people are super friendly, and the scenery is awe inspiring.
We went to a truely remote community in Newfoundland called Rencontre East. It's only accessible by Ferry, and it's a 3 hour car ride to get to the Ferry. It's an outport fishing town with a population of about 170 according to 2006 statistics, though I believe more recent numbers would put it closer to 120. Primary industry is the fishery - Cod, Caplin, Lobster, and Crab.

Wharves along the Harbour
It is an absolutely beautiful place to visit. The mountains and valley were forged by a glacier, and there is a fiord (lake) nestled between the mountains, which is 600 feet deep. The lake is home to sea trout and salmon, and possibly other species. Our desitination was to a small cabin at the far end of the lake, and required us to take a boat from the coastal side of the lake to its head.

Heading up the lake
We fished along the way, using a locally made spinner called a spoon spinner. It seems to be the only thing that works in this lake, for the majority of the fishing done here. We managed to catch 13 trout that afternoon, before finally setting foot on the far shore and the beach in front of our cabin.

Cabins on the beach
The next day, we had trout for breakfast, and they were quite a treat. There is nothing better than enjoying the fruits of your labor. After breakfast, we got geared up for a trek around the lake by foot. We have to cross two shallow rivers, as we trek to the left of the cabin, and around the lake. It's rough going, as the shoreline is peppered with fallen rocks and boulders from the sheer rock faces above. As well, there are many natual springs and spectacular waterfalls.

One of the many waterfalls
We fish along the coast for about 4 hours and it starts to rain. My friend is a short distance ahead of me, at what the locals call Duffy's point, while I have sought out the protection of a small overhang of rock, where I make a dry place to sit and have a snack while the rain falls effrortlessly on the lake. My friend makes his way back to my semi-dry shelter, and we enjoy a drink and some home made trail mix. We discuss my inability to land any trout today, and his many catch and releases and the 3 keepers he has so far. I am feeling a bit dismayed to say the least.

Not a Keeper, but funny none-the-less
After the rain let's up, we decide to turn back for the day, and fish our way back to the cabin. Part way back, I stop at a spot where I know there should be some good fishing. Since I'm not having any luck with the spinner, and I' tried every lure I have, I decide to try a plain old bobber and worm. The locals warned me that this never works and you can't catch anything without a spoon spinner here. So far, that seemed to be the case, but I was real desperate to not be shown up.
So, I set up my line and cast. No sooner than the line hit the water and I had a strike and lose it. Followed by several others, that I cannot land. My friend sees that I am now sitting on a rock and not following him back. I motion him to wait or come back, which he does the latter. By the time he get's back to me, I have landed my first keeper for the day. It's not huge, but it will do. We stay a bit longer and eventually I catch another worth keeping. So, you can catch by bobber here.. wish I had tried this earlier today.
Eventually, we get moving again, and after a total of 6 hours walking and fishing, we are back at the cabin. We set a fire and prepare a meal of chicken and some bottled moose. We play some cribbage, anbd have a few drinks before finally retiring for the night.
The next day, we plan to fish for the morning and then we will boat back to the other end of the lake and back to town. We had an offer to go out on the ocean and jig for Cod fish, and we are quite looking forward to this. The mornings fishing was uneventful, and my friend managed to land one trout, while my line lay bare. At least we had Cod jigging to look forward to.
While we never caught many trout, the trip was amazing. Anyone looking to get a real outport experience, simply must travel to Rencontre East. The people are super friendly, and the scenery is awe inspiring.
Wednesday, July 29, 2009
New TACACS+ (tac_plus) server package
Over the last couple of weeks I have been working on packaging, testing and patching a TACACS+ server to work with Ubuntu Server.
I figured it was time to post up a quick blog about this package, and hopefully see what interest there was out there for this service.
What is TACACS+ and what does the tac_plus package provide?
TACACS+ (Terminal Access Controller Access-Control System Plus) is a protocol which provides access control for routers, network access servers and other networked computing devices via one or more centralized servers. TACACS+ provides separate authentication, authorization and accounting services.
This package provides the server (daemon) for TACACS+ which responds to authentication requests from a RAS (Remote Access Server). The daemon will validate the request against an SQL database, and provide authorization and the level of access, if the authentication passes. The RAS can also provide accounting information to the daemon, for logging purposes.
Please note, there are other implementations of the TACACS+ protocol out there, some of which are unmaintained. This particular version is maintained and is a complete re-write of the TACACS+ daemon from Cisco Systems, and has been implemented in C++. It is under heavy development, and there may be some bugs or missing features in this release. I am working with the author to ensure these things get properly reported and addressed as they are discovered.
Where is this package available for testing?
It is currently in beta testing in my PPA: https://launchpad.net/~roderick-greening/+archive/ppa
Where can I get the source?
The source is currently hosted at http://www.networkforums.net/, and you will need to register for an account to access the download area. I am working with the author to get this hosted in a proper prepository like sourceforge, github, launchpad, etc. Please be patient while we work these details out.
The Web UI for configuration is not yet packaged. You will need to get the tgz from main site until I get it packaged.
Why this version and not some other?
1) Fairly new project
2) Active development and maintenance
3) C++ :)
4) Has a Web UI for configuration (to be added to package shortly)
5) Uses a db to store configuration and AAA logs rather than plain text files
Anyway, feel free to test it out. Also, please give me feedback on how this works for you. Remember, you need to get the Web UI tgz after installing this package and set it up. Hopefully, I'll get this packaged in the next week or so, time permitting. There is a man page (man tac_plus) and a readme (README.Debian) which should help in getting things up and running.
Wednesday, July 15, 2009
I'm an Uncle...
So, my sister finally had her baby on July 9th - a whopping 11lb 13oz boy.
Baby, Hunter Jaxon, is 22.5in long, and I swear will be walking in no time. :)
Anyway, just wanted to share my joy with everyone. I guess, I'll be spending some time with my new nephew over the coming weeks, so I may not be as active developing over the next couple of weeks.
Anyway, things should get back to normal soon.
Here's a pic of me and Hunter:

Tuesday, July 7, 2009
usb-creator-kde - available for testing
So, I meant to post this up a couple of weeks ago... better late than never.
I have posted an early beta copy of usb-creator package in my PPA. It contains packages for both the gtk and kde front-ends and a common package, which contains the back-end, and some other common bits.
If you are interested in trialing the beta, feel free to download the debs or add my PPA to your sources.list (if you add it to your list, please read the warning on my PPA page).
To get the files, navigate here.
Here are some screenshots showing the kde front-end in action. Enjoy!


Wednesday, June 17, 2009
usb-creator-kde - in action and with icons...
Here's a new screenshot showing usb-creator-kde with media detected and some icon bling (icons subject to change).
Basically, I updated the ui elements from QPushButton to KPushButton and assigned icons as KIcons based on appropriate icon/button functions. So they should change with the icon theme - yay.
Anyway, here it is...

usb-creator-kde - adventures in gobject land
I'll first start out with a disclaimer: I am not fluent in Qt nor Gtk programming. What I know or have learned is through the internet, various books and reading others code. So, what I describe below may not be the best way to achieve the end result, but it appears to work and allow for minimal interference with an existing application backend.
Now that that's out of the way, I'll proceed with the discussion: porting gobject calls to Qt so that I can get a usable KDE/Qt frontend for usb-creator-kde.
Now that that's out of the way, I'll proceed with the discussion: porting gobject calls to Qt so that I can get a usable KDE/Qt frontend for usb-creator-kde.
For the gtk client (usb-creator), the backend currently implements timers, callbacks, and process watchers via gobject. Similar mechanisms exist for Qt. The current backend is unsuitable for general use by both a gtk and Qt frontend as gobject and Qt seem to tromp all over one another, and cause the frontend to crash. TO get around this, we need to move the gobect calls to the gtk frontend, and implement wrappers that the backend can call from the frontend. Once we have wrappers in place, we can then re-implement the wrappers in our desired frontend (e.g. PyKDE).
Here's an example of some code from the backend:
self.timeouts[udi] = gobject.timeout_add(UPDATE_FREE_INTERVAL, self.update_free, udi)
And from the PyGtk manual:
timeout_addint timeout_add(int interval, callback callback [, mixed user_data1, ... ]);Registers a function to be called periodically. The function will be called repeatedly after interval milliseconds until it returns false (or nothing) at which point the timeout is destroyed and will not be called again.So to keep the timeout alive, your callback function needs to return true;
Unfortunately, there is no single call in Qt that provides this mechanism (none that I know of). So, to implement this, I needed to write a couple of functions, using unnamed arguments lists, lambda notation, etc.
First off, we need a generic timer callback function that will call our passed function, test the return value, and stop the timer if the return value is not True. I also want this function to be private to my frontend class. Here what it looks like:
def __timeout_callback(self, func, *args):'''Private callback wrapper used by add_timeout'''timer = self.sender()active = func(*args)if not active:timer.stop()
So, func is the passed calback function to execute, followed by a list of optional arguments *args. The sender will be a timer object, which we get from self.sender, assuming that the parent is some QObject or derivation thereof (in my case, the frontend class KdeFrontend is derived from QObject).
Ok, that allows us to have an arbitrary function with any number of arguments, and have it stop a timer when appropriate. We now need to implement the public wrapper that will use this private callback. Here is the code for that:
def add_timeout(self, interval, func, *args):'''Add a new timer for function 'func' with optional arguments. Mirrors asimilar gobject call timeout_add.'''timer = QTimer()QObject.connect(timer,SIGNAL("timeout()"),lambda: self.__timeout_callback(func, *args))timer.start(interval)return timer
The add_timeout function takes the same parameters as the gobject.timeout_add function. Inside, we setup a new timer, connect it to our private callback, start the timer and return a reference to it. The magic is in how we connect the passed function func. Notice that we use lambda to call our private callback, passing along the func and *args. Normally, you do not pass a function with variable parameters to Qt connect statements, but in our case, we absolutely are required to do so. This is where using lambda comes in handy.
So, there you have it. A way to implement gobject.timeout_add using Qt. While everyday use of this is not likely, it will certainly help in porting applications from PyGtk to PyQt. I hope someone out there finds this useful. I know I searched for an easy way to do this, and never found anything. After lots of trial and error and asking lots of questions to my fellow developers, I was able to come up with the above.
Cheers.
Tuesday, June 16, 2009
usb-creator-kde - update and screenie
The creator is steadily moving along. Right now the main stumbling blocks are gobject calls in the backend and the use of a DBusGMainLoop in the backend.
Together, these constitute a non-working backend for PyKDE/PyQt. KCrash has become a nightmare.
In order to get around this, we need to pull out the gobject and DBusGMainLoop and move them somewhere related to the frontend. At that point I can re-implement the bits I require as PyKDE/PyQt code, while maintaining a common backend code base.
I've taken the first step, and moved DBusGMainLoop to the gtk frontend via a wrapper. I have re-implemented similar functionality via the same wrapper in the kde frontend using DBusQtMainLoop.
Next on the list is to rip out the gobject calls... I suspect a couple of days before I get that all figured out... (unless I get a real dose of inspiration).
Anyway, here's the screenshot as promised, so you know it's not all pie-in-the-sky :)

Monday, June 15, 2009
usb-creator-kde... for karmic
So, during UDS, the Kubuntu team decided it would be nice to work on making Kubuntu easier to install on netbooks.
The are several things that need to be adjusted to make the netbook experience enjoyable, but the first real thing required is a native client for putting a Kubuntu desktop image into a usb stick.
There already exists a PyGtk front-end, but no PyKDE one. At UDS I decided to take on the task of porting the existing PyGTK client to PyKDE.
At this point, I have ported much of the required code base to support a native client for Kubuntu. There are still some bugs to fix, and some of the new code for the PyGTK front-end does not yet work 100%, and hence neither does the PyKDE front-end.
If anyone is interested in looking at the code and feels like offering advice, it can be found here: https://launchpad.net/usb-creator
To check out the code: bzr branch lp:usb-creator
Anyway, I am working closely with the usb-creator team, and hope to get this working/completed within the next couple of weeks.
Thanks to all who have helped thus far.
Saturday, May 23, 2009
Where have I Been?
Wow, I can't believe it's been about 5 months since I last blogged. That will tell you how hectic my life has been lately.
What's been happening? Well, for one, I'm about to be an uncle... my little sister is having a baby due in less than 7 weeks. I think I am almost as excited as she is! :) I can't wait to spoil the little tyke .. hahah!
Besides that, I have been really busy with work. We are undergoing some changes, and as a result, it has pulled me away from my normal Kubuntu packaging. However, I now have things mostly back in order, and am back to my packaging duties.
Finally, I am typing this at the airport, on my way to UDS Barcelona. I think this trip will be much more interesting than the California one, and definately hotter. I don't think I packed enough shorts... :)
Anyway, here's to hoping I have more time to blog and more frequently.
Wednesday, December 10, 2008
UDS Jaunty - My Two Day Replay
The last two days have been very busy indeed, so much so that I missed blogging about Day 1, hence the "Two Day Replay".
Day 1:
I awoke at 6:40AM, not to my alarm, but just by mere fluke. A certain roomie (who shall remain nameless), made certain to set the alarm for 6... AM, but missed the fact that the clock itself was not set correctly for AM. So, when I awoke, the clock was actually showing 6:40PM. The day was off to a great start, as luck was apparently on my side.
After a much to large breakfast, we headed outside to get the bus to Google. I was really excited to be a part of this great community and be afforded the opportunity to go to UDS.
The summit began with an introduction, and a brief overview of things to come. Mark provided some keen insights on where we are headed, what the market is doing, and how we are going to get there. Now I was really getting pumped.
Here's how the days sessions ran for me...
Desktop Experience Plans
The Ubuntu Desktop team outlined their plans for notifications in Jaunty, which are similar to what we have in Kubuntu with KDE 4. While not terribly exciting to most, it does show their interest in both usability while adding in some nice bling.
Debian / Ubuntu Relations
We had a great discussion here about how the various Ubuntu flavors could work together to foster better relations and involvement for the core/motu Ubuntu developers. A lot of ideas were presented, and hopefully, something good will materialize.
Upcoming Launchpad Features
Kiko gave a great talk on Launchpad 3.0. Lots of upcoming features and of course, the big one, open sourcing Launchpad.
NetworkManager connection policies
There were some discussions about how to handle 3G, wireless, and wired and how best to setup policies on creation and tear down of these connections. Currently NM will keep up multiple connections, but there was a con-census that this is not our desired behavior. We discussed some use cases to present upstream.
Kubuntu Jaunty Gap Analysis
A lot of items got covered in this one, like auto-installing flash for KDE 4. The discussion then lead to the whole kubuntu-restricted extras and the fact that the user generally doesn't know to install this package to get flash, mp3, etc, unless they read it in some wiki or forum. So we decided to add this as a check to update-notifier-kde, and provide the user a chance to install some or all these packages. This is a great thing for our users. There were a lot of other things discussed, so feel free to review the spec
The day ended with a great meal at a local Tai restaurant. I had Tom Kha soup and Spicy Peanut something or other. It was pretty good. Some found it spicier than others (/me points to Tonio).
Day 2:
Ubuntu Developer Process Review
A great session by Daniel. It has inspired me to seek developer (MOTU or "insert new name here") status in the near future. I think once I get past Jaunty release, that will be the time to apply, as I will have gone through a complete development cycle, having only started near the end of Jaunty.
Jaunty Ubiquity Usability
We discussed a few UI changes to the installer to improve usability. One of the major changes is to the timezone chooser, which should definitely be an improvement over the existing one.
Kubuntu Jaunty documentation
We need lots of help getting the docs updated, both in upstream KDE as well as for Kubuntu specific packages, etc. If you can use a text editor, you can help.
Tonight I had one of the best burgers, from Chili's. 3 different cheeses, thick back bacon and a pattie which was about an inch thick. After supper, we had a great jam session at the hotel. Everyone sang, played guitar, drums, etc. I'll try and post some pics later, but it's late now and I must get some sleep for Day 3 is fast approaching.
Sunday, December 7, 2008
ufw-kde - a simple firewall for Kubuntu users
Well, as I head out to UDS, I am putting together my demo of ufw-kde, a GUI front-end to ufw (the Uncomplicated Firewall), which is command line based only.
Here is a preview screenshot:

Here is a preview screenshot:

Subscribe to:
Comments (Atom)